Building a Jonsbo N2 Home Server
For some time I have wanted to build my own home server to store all my documents and photos, run self-hosted services instead of paying (either with my wallet or my privacy) for "cloud" subscriptions and to centralise my backups. I do a lot of webscraping as part of my economics research so having an always-on device that can run in the background is useful. I also want to experiment with a build-server setup for my data analysis, and have struggled with large datasets and private GitHub actions workflows.
I live in a small apartment so I wanted something compact but more capable and extensible than a pre-build device like a Synology. I flirted with choosing its sister, the Jonsbo N1, but it looked liked a furnace and it lacked the ability to hotswap drives. The other consideration, the Fractal Design Node 302, was a bit too large and difficult to get hold of. Once I saw the N2, it looked pretty much exactly what I wanted and I promptly ordered it off Amazon.
The Case
The Jonsbo N2 takes a mini-ITX motherboard and can hold up to 5 3.5 inch HDDs in the main bay plus two 2.5 HDDs upstairs. This is currently excessive storage space for my current usage but it feels nice to be able to easily upgrade in the future.
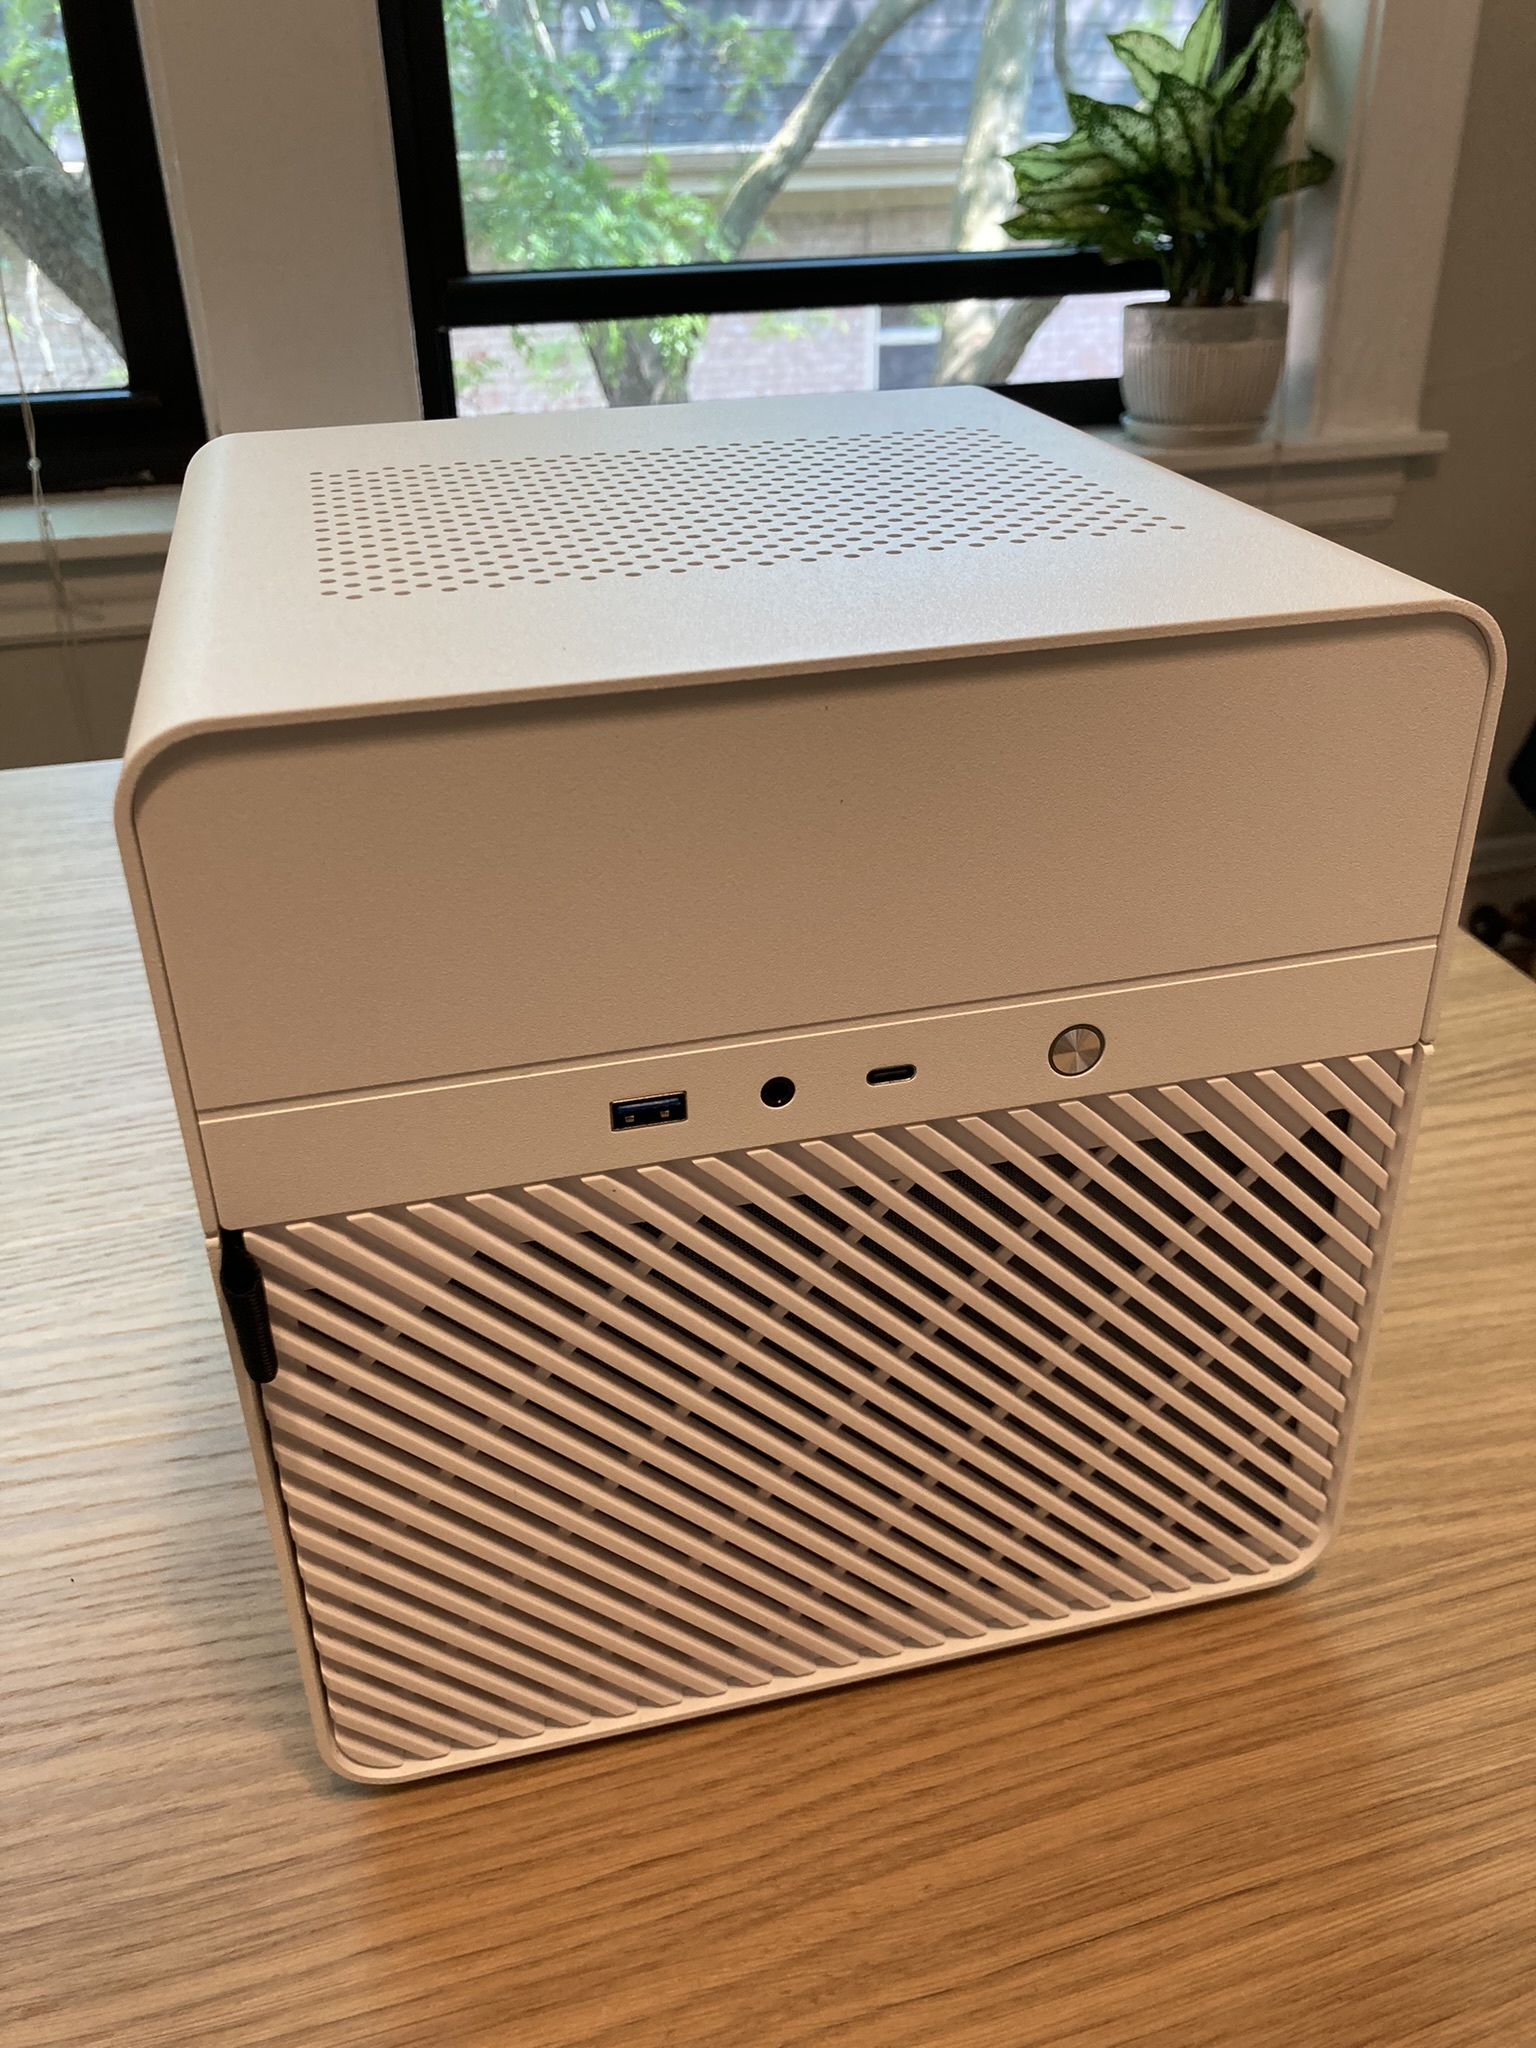
My first impression was that the case felt like well-made premium product. The magnetic dust cover for the drive cage was a nice touch. The top cover requires a hex key to remove, and there is a little foam holder for this on the front. This was something that I wasn't keen on: I feel that I might strip the hex screw with frequent use and the foam holder, well, feels a bit naff. I don't see any benefit over using standard Phillips or Torx screws, and a screwdriver but that's just me.
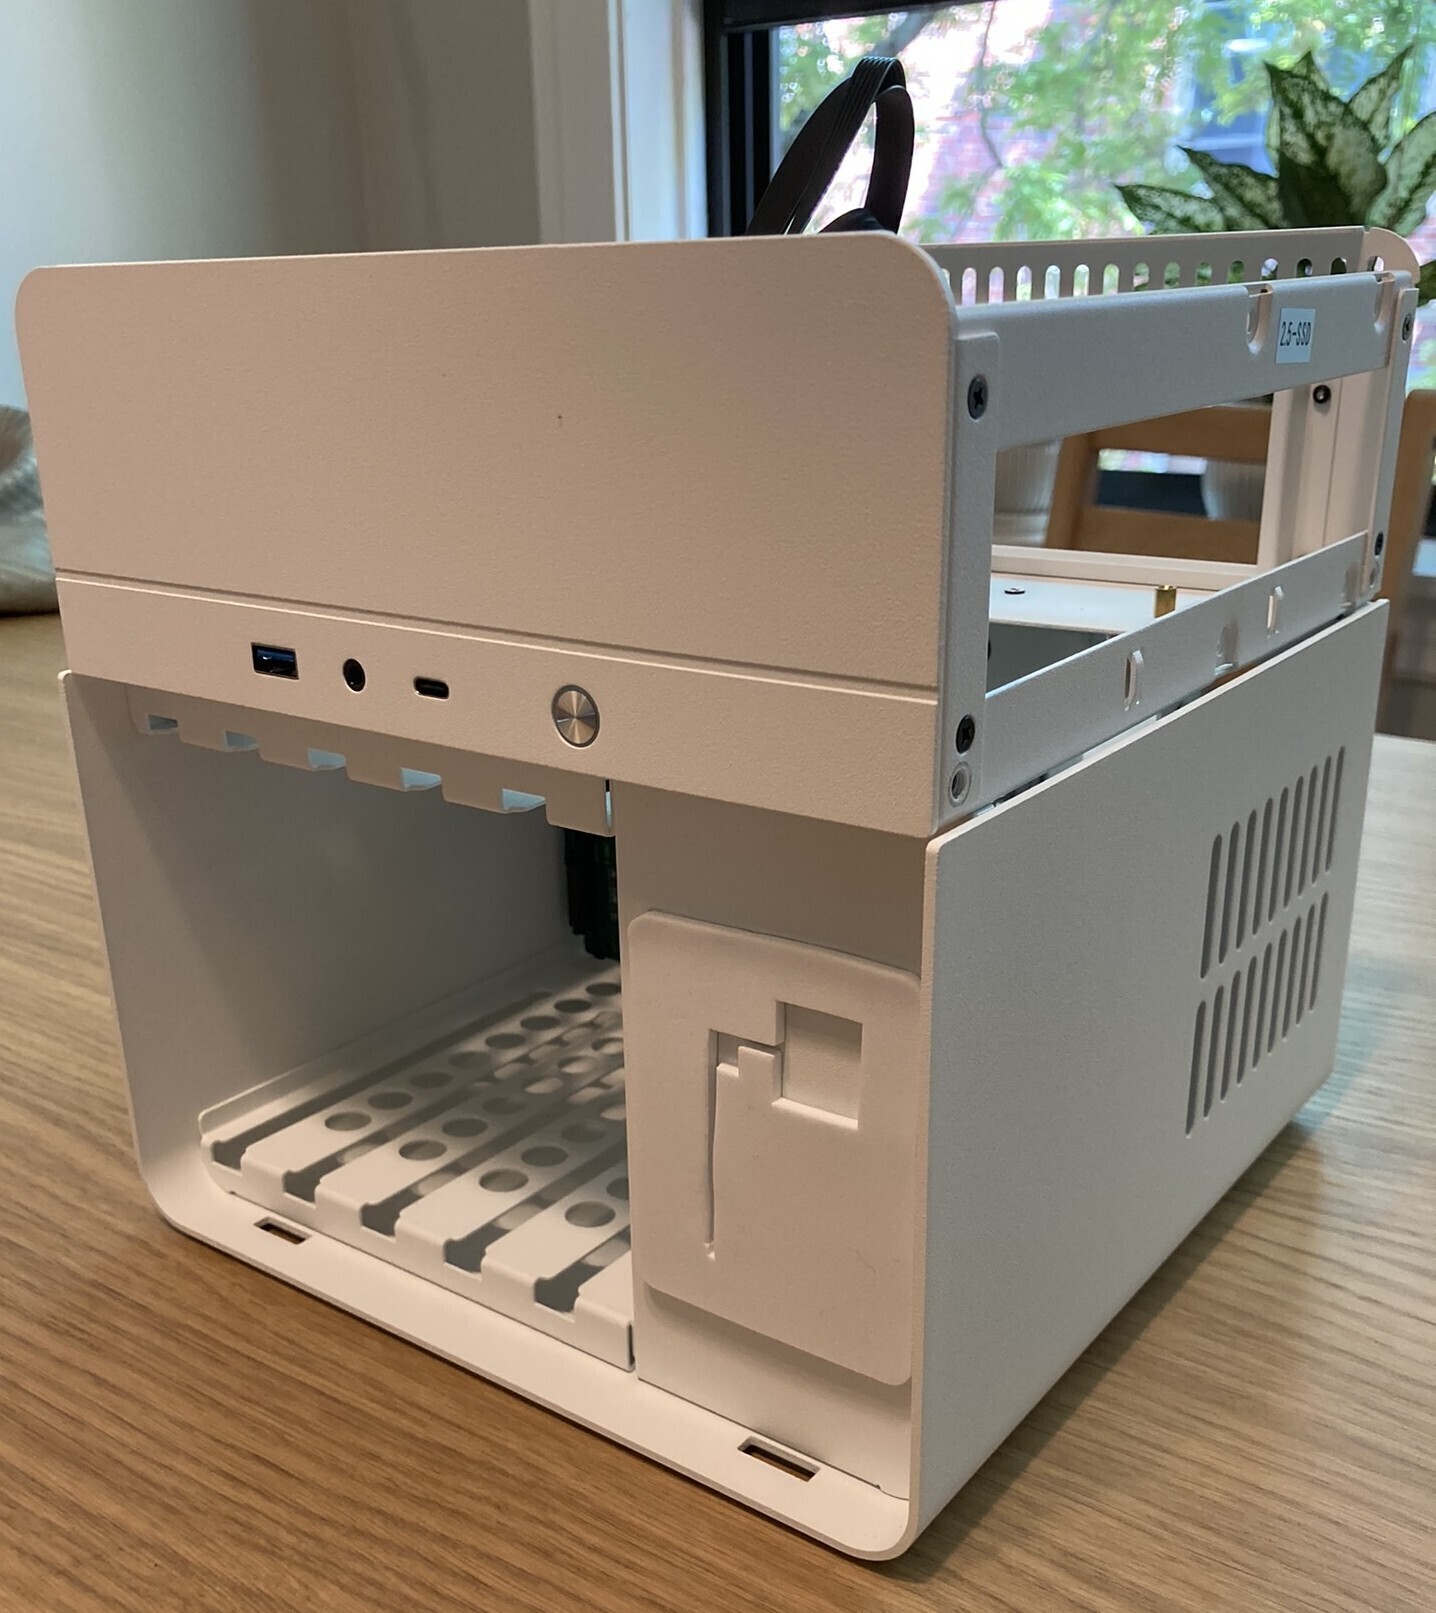
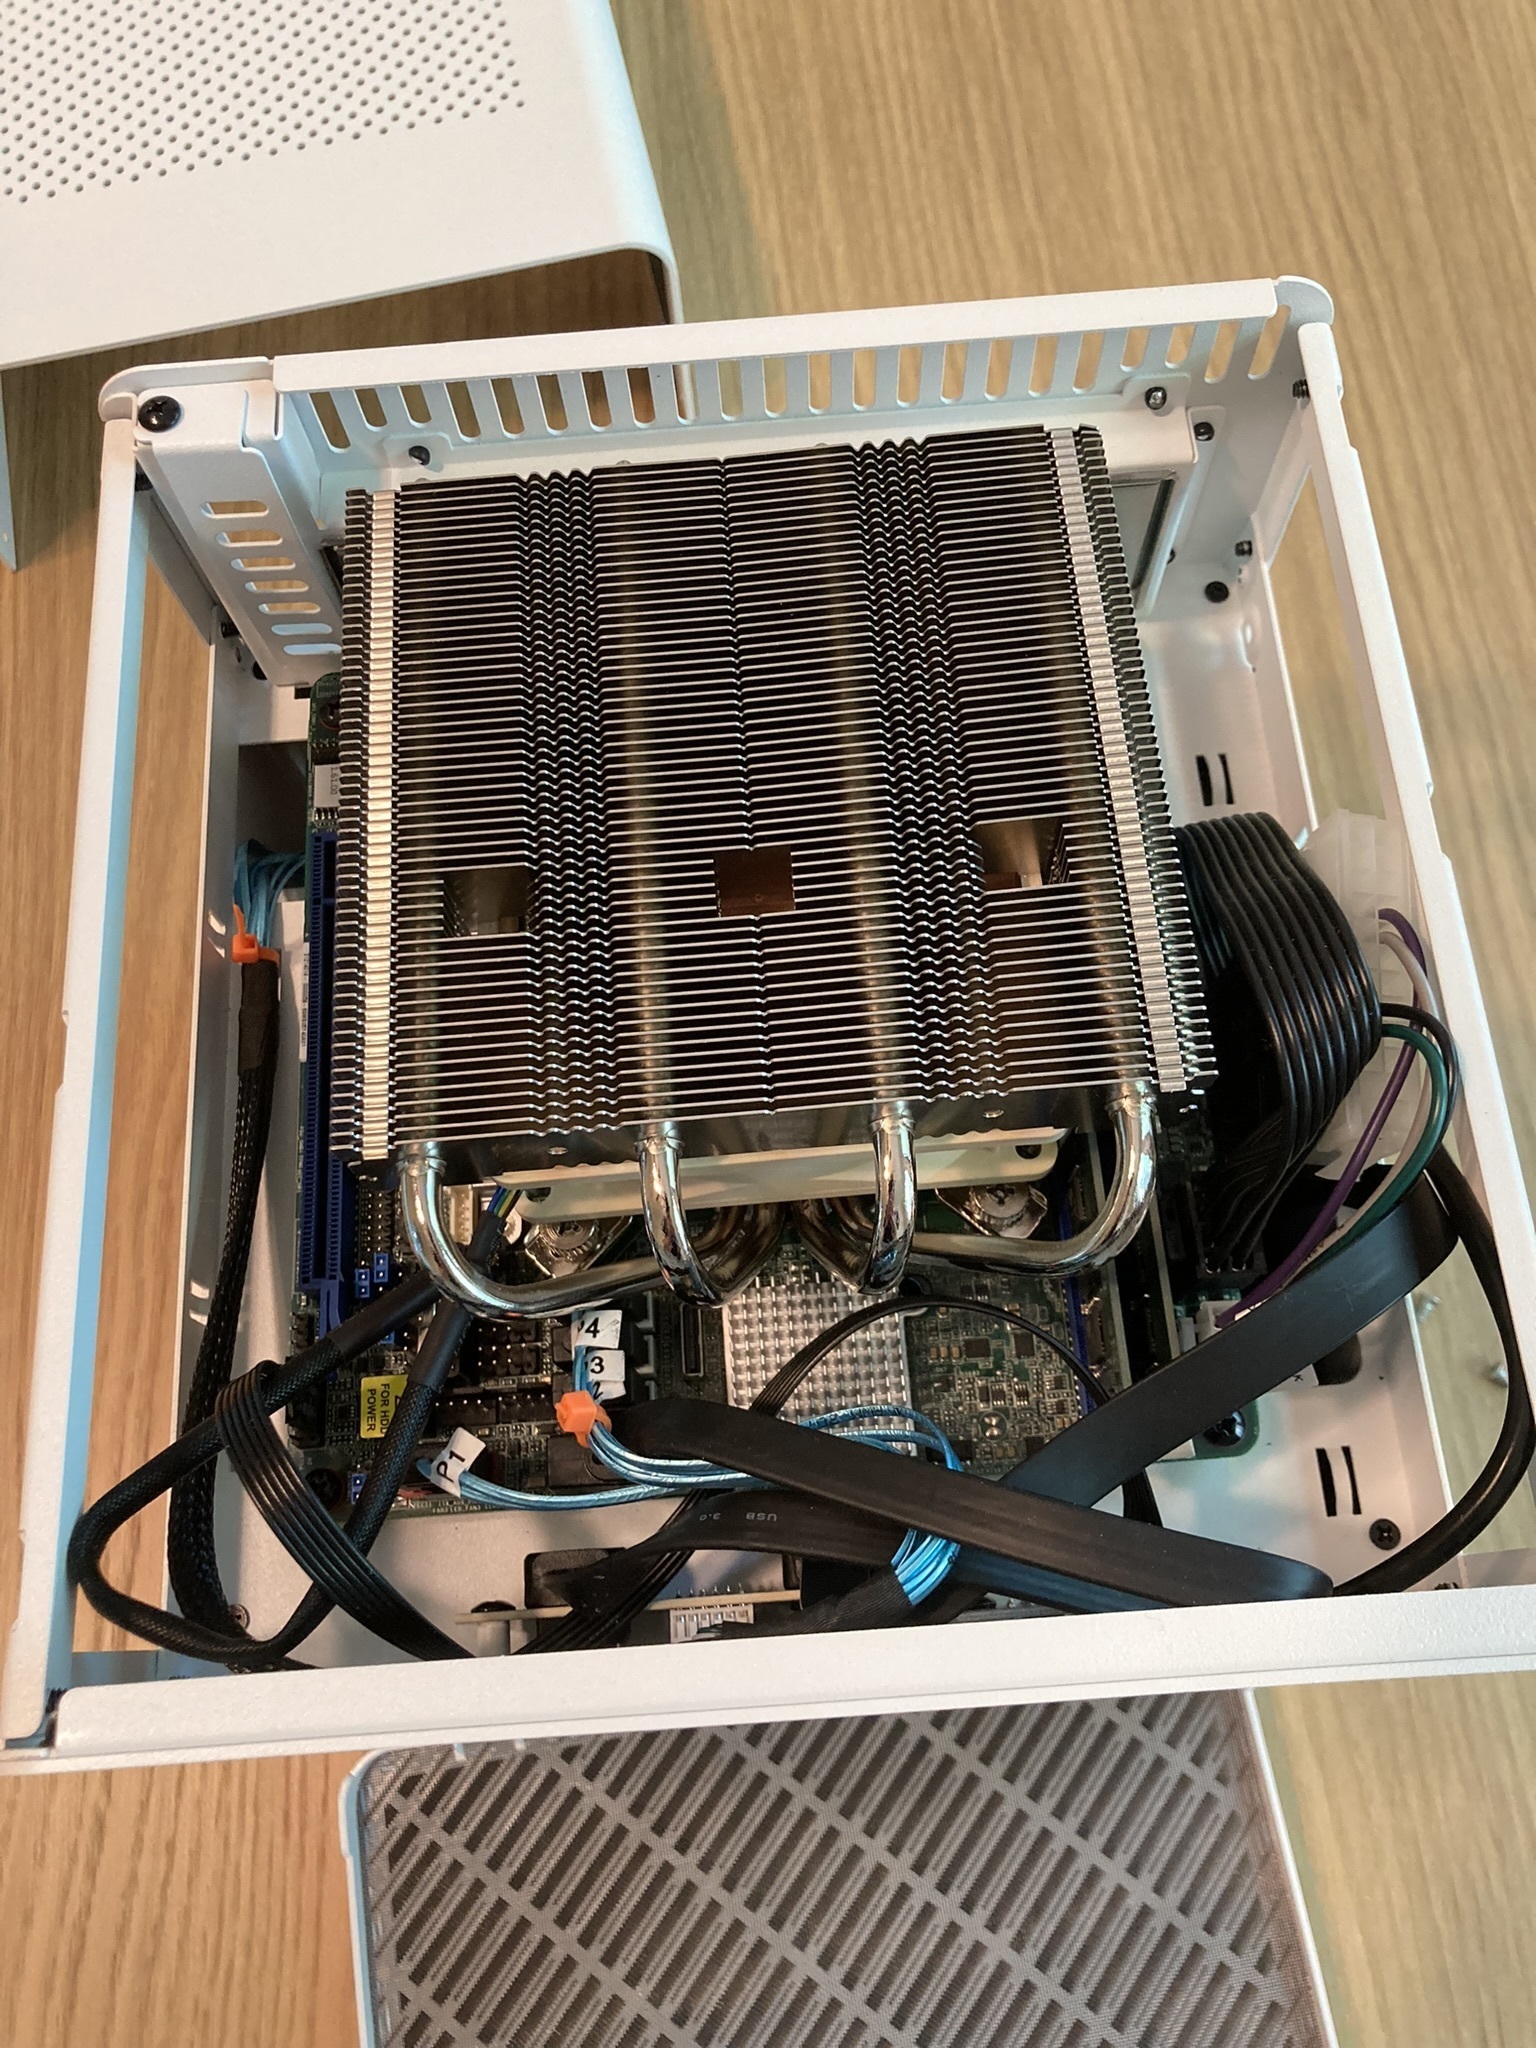
Building inside the case was relatively easy but space is constrained. The most useful tip is that once the motherboard is installed it is not possible to connect another cable to the PSU. This wasn't a problem for me but if you are installing SDDs upstairs, then you would need to remember to install the necessary power cables in advance. My motherboard required an adapter from the standard ATX 24-pin power supply connector and this was bulky to fit in the case together with the long power cable itself. One annoyance is that the cables for the front panel are excessively long and really get in the way; plus the case includes an audio connector that home servers and NASs generally won't need and many mini-ITX motherboards don't support. If you want tidy cable management then you may have to splash out on shorter custom cables. The specification states that the Jonsbo N2 supports a maximum CPU cooler height of 65mm but I found that the 66mm NH-L12 Ghost S1 Edition fits just fine.
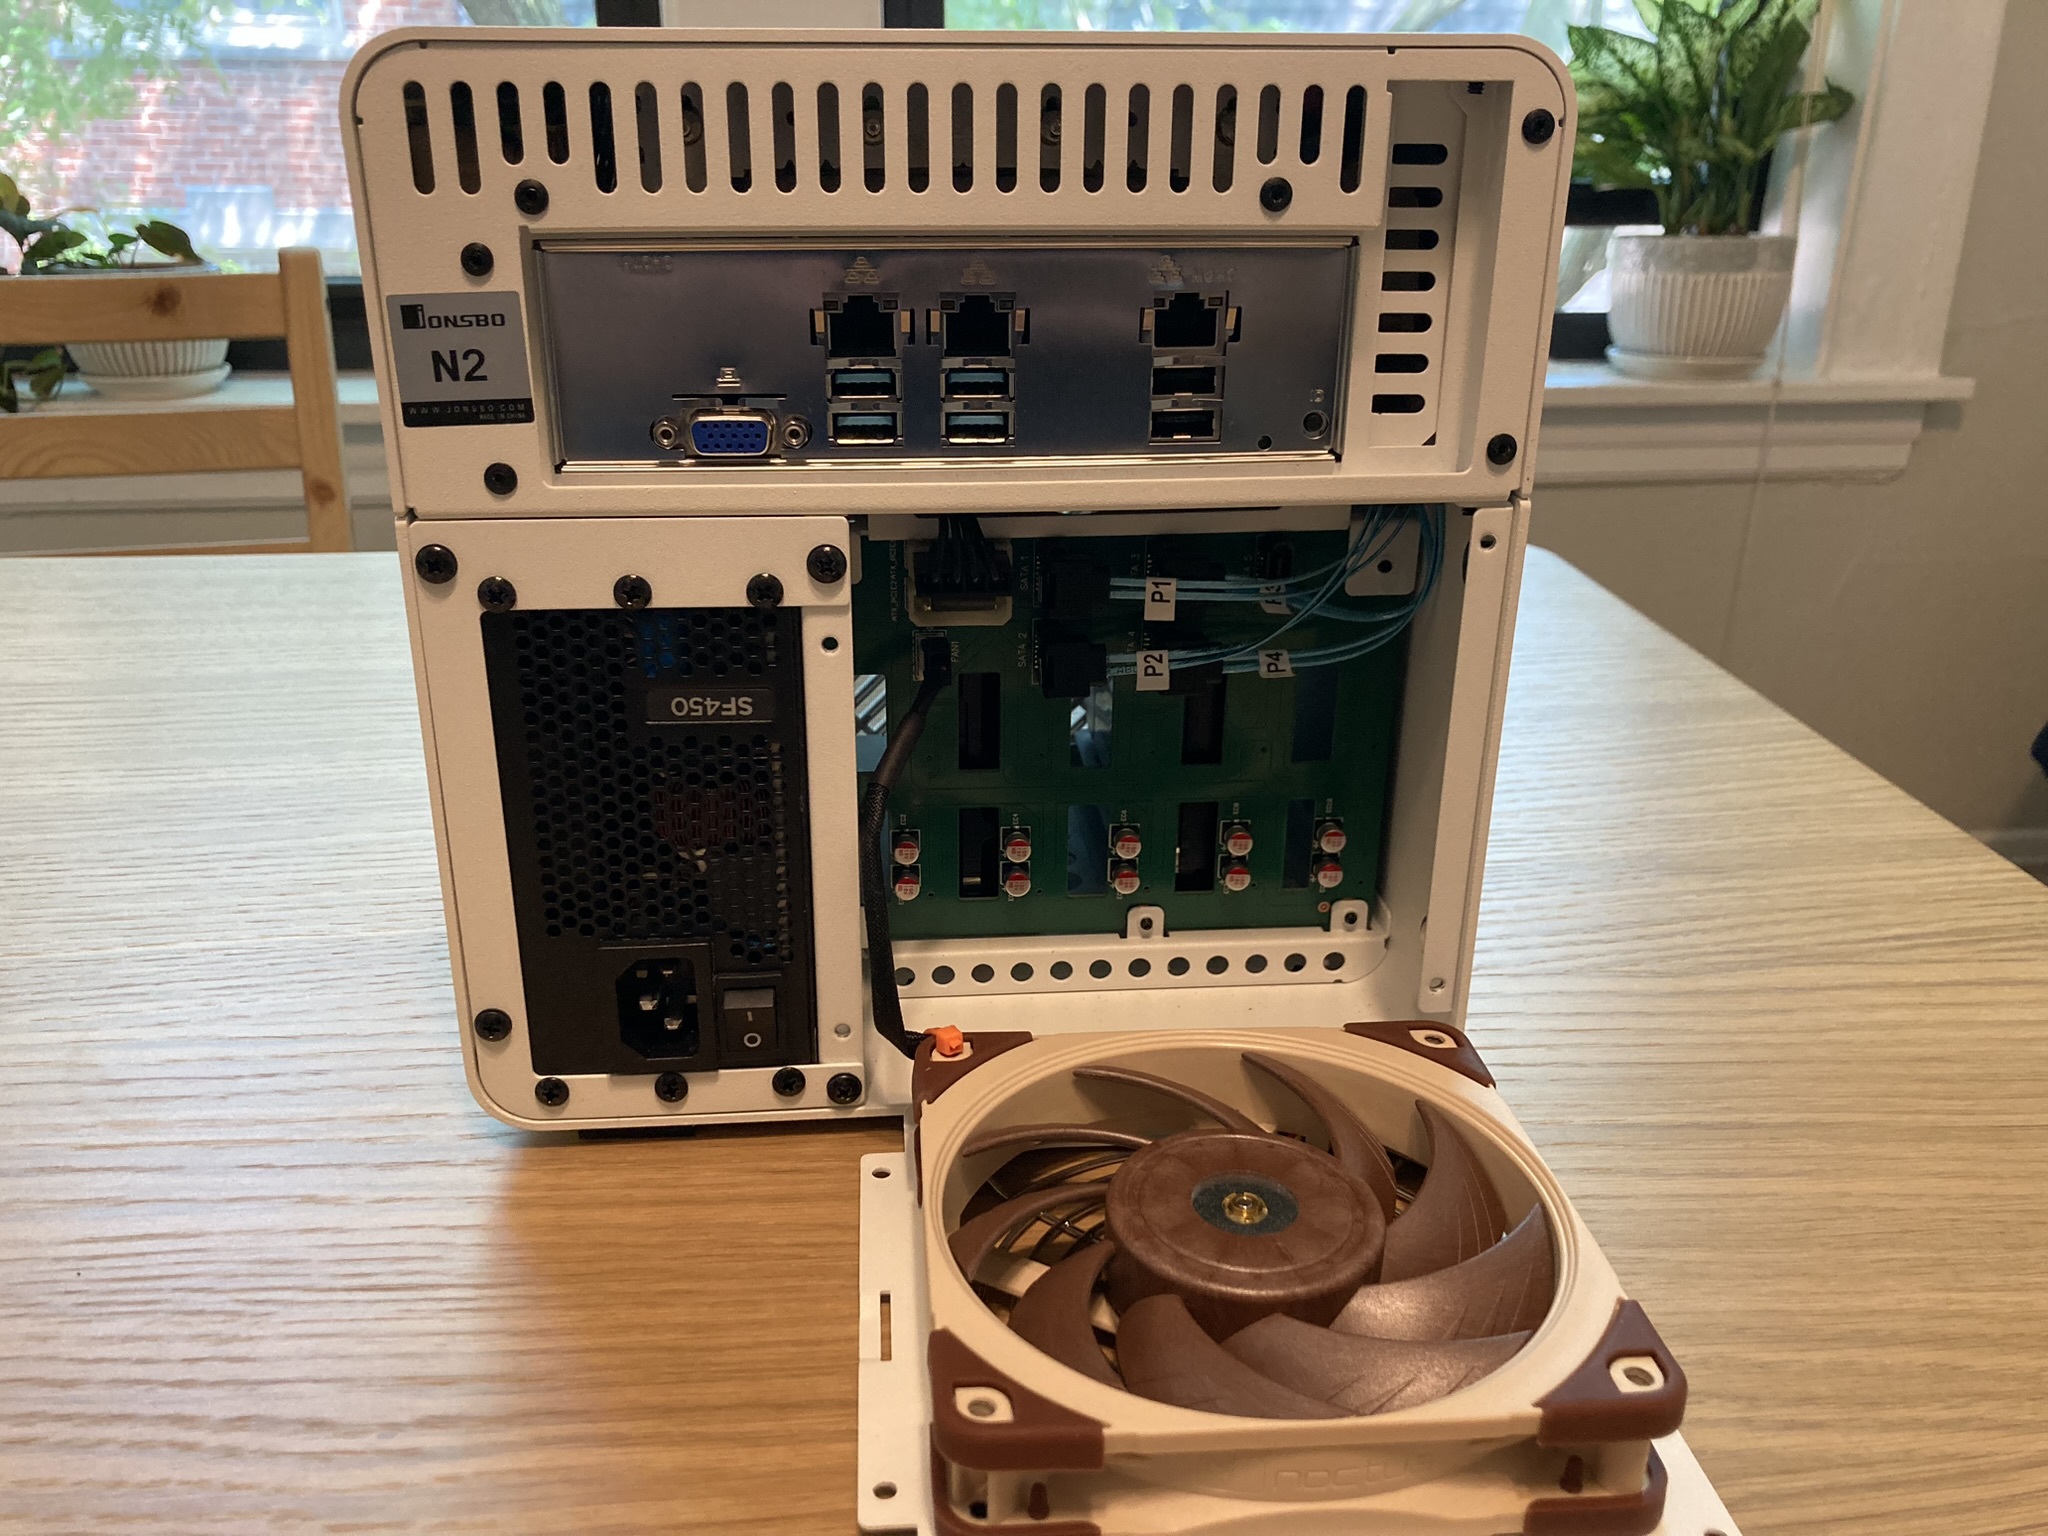
Finally, the rear fan. The included 15mm fan is rather noisy, and this is further amplified by Jonbso sandwiching it between two dense mesh covers that ensure nothing gets caught in the blades. But contrary to what I read online: it is possible to fit a 25mm fan although it is a bit of a squeeze. I replaced it with a 25mm ultra low noise Noctua which just fits and replaced the external mesh with a protective grill I found on Amazon to help the airflow. Jonsbo strongly recommends right angled SATA cables (not using them voids your warranty for the backplane) but the main issue are the molex connectors: the Corsair PSU I'm using comes with three molex connectors per cable which is very unhelpful for such a space constrained build, and I found it impossible to connect both molex connectors on the backplane together with a 25mm fan. So currently I have just plugged in one of the molex connectors which seems to power both my HDDs just fine. I also saw some much smaller clearance custom-made molex cables that I purchased for a few dollars but they haven't arrived yet.
After some testing I flipped the airflow of the CPU cooler to exhaust out the perforated top and added two 40mm and 60mm fans to both sides as intakes. This seems to provide ample airflow to keep the CPU cool (it peaks at around 75 C) and some positive pressure to try to keep the dust out. It also means the air circulates in through the filtered inlets on the side and then out the unfiltered top which makes more sense to me than the other way around.
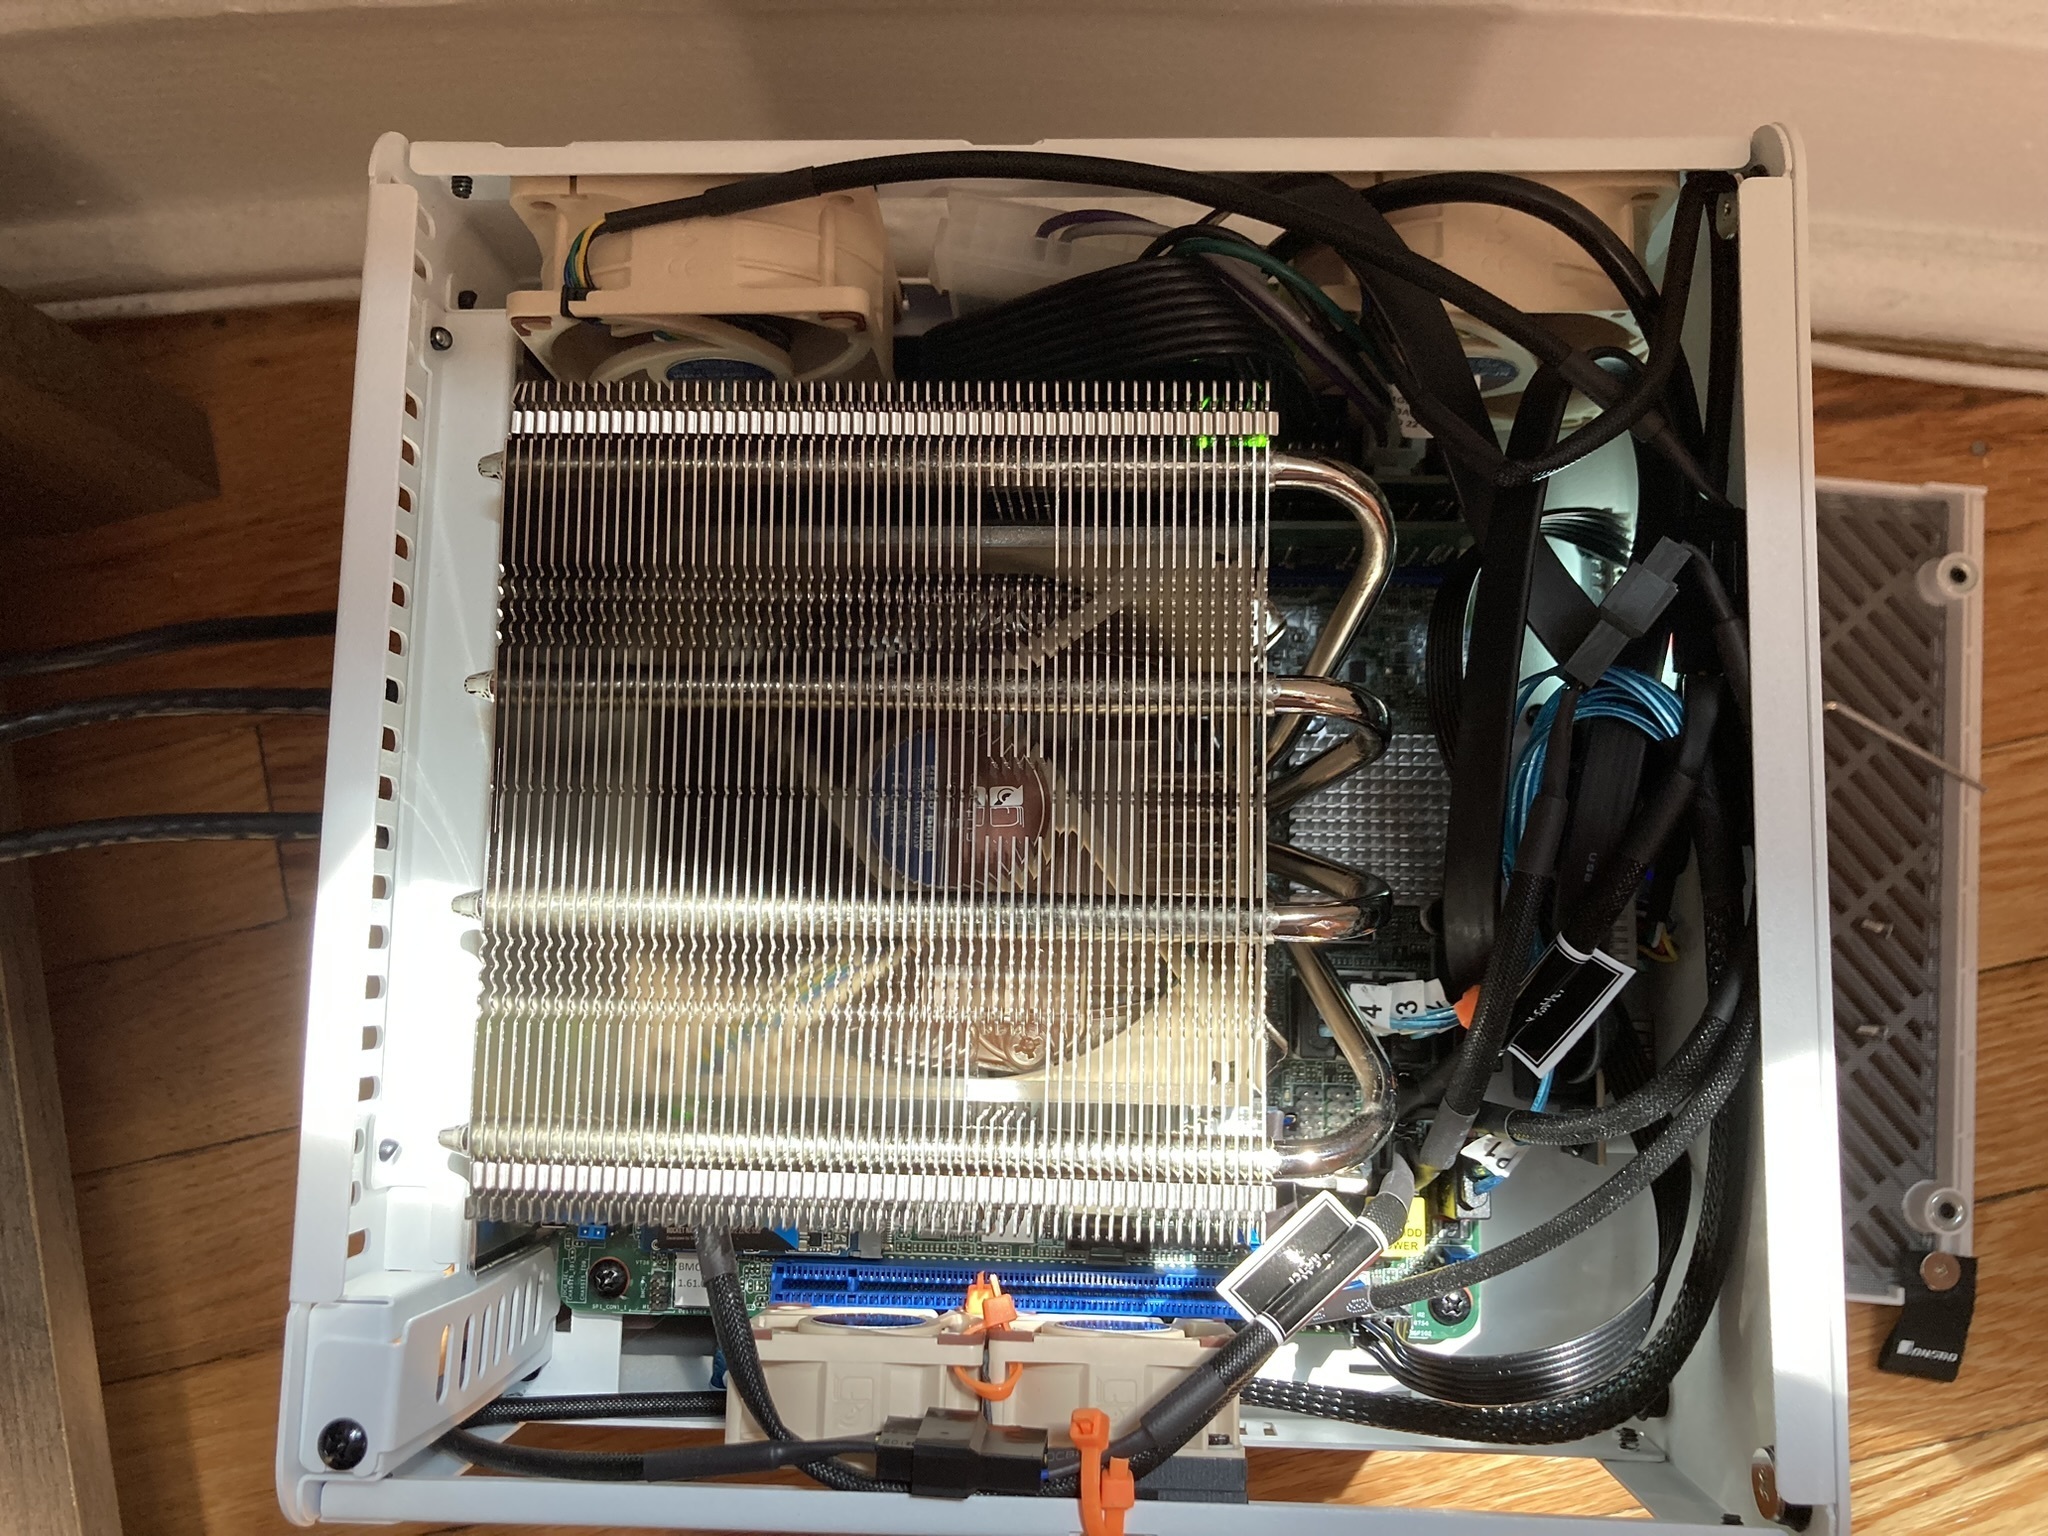
One negative of the case is the lack of pre-drilled holes to attach fans. There are some holes drilled for 2.5 HDDs but some more screw holes for attaching fans would be appreciated and instead I had to resort to double sided tape and zip ties. With my extra fans there currently isn't any space for a PCIe device but I'm not using 10GE and the CPU has Quick Sync support so there is no need for a GPU. For extra cooling, it might be possible to flip the main fan and have it force in air from the back and through the gaps around the motherboard. This, and the rear fan, is an example of how the case feels just a bit too small. An extra centimeter or so of width and depth would allow for a larger rear fan without having to be very careful with the molex and SATA connectors, and would give enough space around the motherboard to fit fans that could substantially improve the airflow.
All in all, the case is great and there is nothing else like it currently on the market. There are a few niggles here and there but if Jonsbo resolves them, then the second revision of the Jonsbo N2 would be close to perfect.
Hardware
| Motherboard | ASRock Rack E3C246D2I | eBay |
| CPU | Intel Xeon E-2174G | eBay |
| CPU Cooler | NH-L12 Ghost S1 Edition | Amazon |
| PSU | Corsair SF450 Gold | eBay |
| Case Fan | Noctua NF-A12x25 ULN | Amazon |
| SSD | Sabrent M.2 2242 | Amazon |
| RAM | Timetec Hynix 32GB DDR4 2666MHz Unbuffered ECC | Amazon |
| HDD | Toshiba N300 12GB | Pre-Owned |
| HDD | Western Digital Red Plus 12GB | Pre-Owned |
I went into this build wanting ECC memory, enough SATA ports on the motherboard, Quick Sync support so I don't need to buy an external GPU and not to be too expensive, and I had to compromise on the latter. The first two wants shifts you very much into server motherboards territory; while there seems to be a very healthy market of second-hand mATX server motherboards, unfortunately the availability of mini-ITX server motherboards is much more scarce.
Quick Sync implies Intel, but Quick Sync and ECC is only supported on a small range of Intel processors: Core i3 processors up to the 9th generation and Xeon processors with integrated graphics processors (they have the "G" suffix). But it's not so simple as Quick Sync support also depends on the chipset, and many server motherboards have built-in KVM systems that disable the integrated graphics cards on CPUs. After some research, I found the C246 chipset does support Quick Sync and looked for motherboards with that chipset.
I settled on the ASRock Rack E3C246D2I motherboard and purchased it open box on eBay my second attempt (it seems that some sellers' definition of "open box" includes used motherboards with bent CPU socket pins). It includes 8 SATA ports in total (4 with SATA connectors on the board and 4 more with an OCuLink cable), and supports Xeon E-2100 and E-2200 series CPUs. I also looked at its newer brother, the E3C256D2I too but this would have been much expensive as I would have to purchase a Xeon E-2300 CPU (no second-hand market) and there are no builtin SATA ports so I would have to buy an OCuLink cable just to connect the hard drives. After some eBay lurking, I purchased a Xeon E-2174G rather than a Core i3 - it was a bit more expensive but the server will also be a build / CI server so I went for the extra oomph of the Xeon. This also gives me room to upgrade in the future when the price of E-2200 series Xeons come down. And while I initially considered it as a nice bonus, the built-in IPMI of the motherboard is really helpful especially as hard drives are noisy and the server is going to be hidden away as much as possible.
There isn't that much choice for M.2 2242 SSDs and many of the sellers were from brands that I had not heard of (Dogfish?) so I just bought a Sabrent SSD, and likewise for the RAM choosing Timetec. Finally I installed my existing ZFS mirror running on Toshiba N300 and WD Red Plus 12GB hard drives. The Toshiba is incredibly noisy when seeking so I'd recommend the WD Red Plus if the hard drives are going to be in earshot.
Finally, the server is running NixOS but that's for another post.